Like the original Maverick, the V2 is a compact pepperbox style revolver, chambered in 22 short. The Maverick V2 improves upon the original by altering the grip angle and appearance to be more pleasing, along with adding a linkage to automatically rotate the cylinder when cocking the striker. This allows a much higher rate of fire by operating more like a single action revolver.
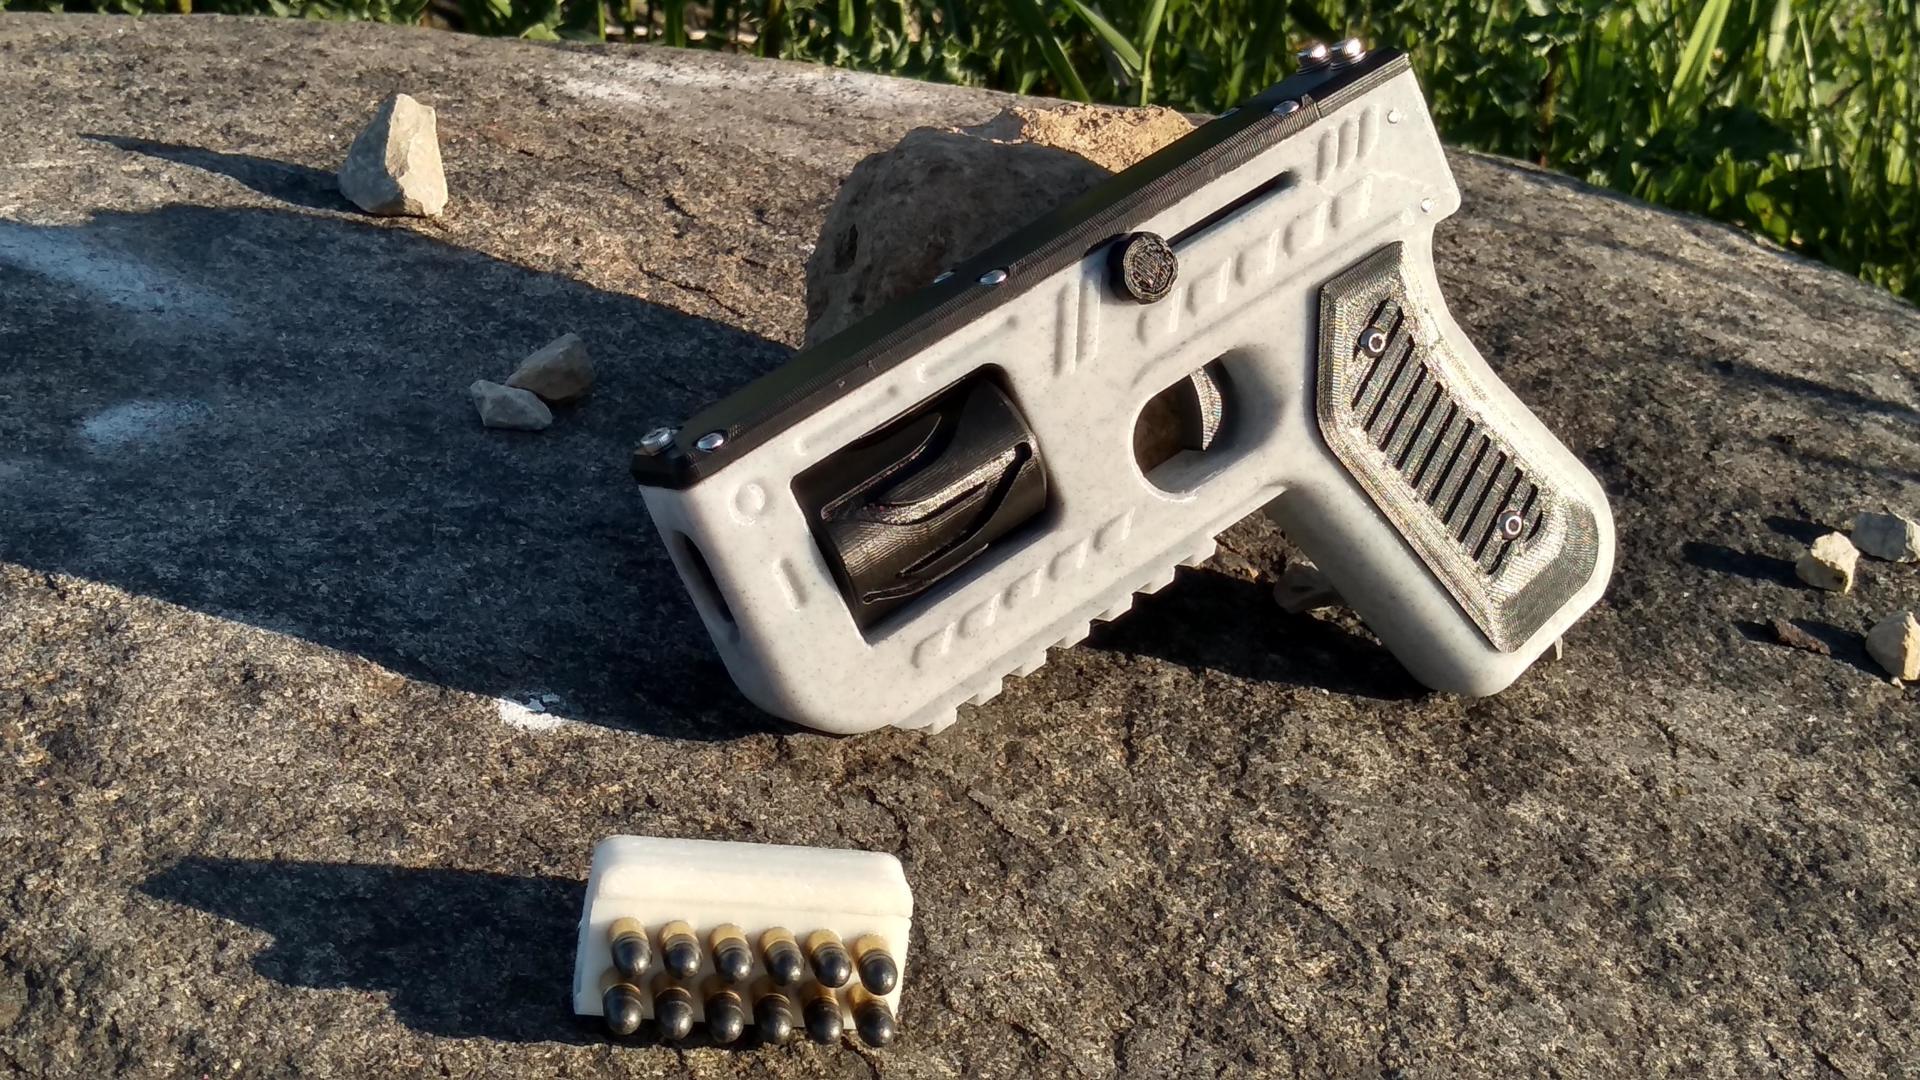
The original ball bearing mechanism is retained to snap the cylinder into position, but the action of cocking the striker now advances to the next chamber, using a linkage following a zig-zag groove in the cylinder. A small charging handle cocks the striker, with the loading and ejection port being exposed on each rearward pull. A tab indicates whether or not it’s currently cocked and ready to fire. Manual decocking is possible, with the mechanism designed to keep the firing pin between chambers until the spring is decompressed, making accidental discharges far less likely.
As before, the Maverick V2 uses .22 caliber ammunition, as a straight walled rimmed cartridge is easy to headspace and ream a chamber for. I again opted for the smaller .22 shorts, as the shorter cases are easier to load and eject from the small side port, and more powerful 22lr loads have proven too much for the plastic breech, and tend to jam the cylinder. With how short the barrels are, I’m sure 22lr would just result in more unburned powder anyways.
Printing
All my parts were printed in PLA+ on a mid-range desktop printer. To provide a bit of extra heat resistance and durability, I print the frame at 100% infill. Large mating parts, such as the frame, were sanded to compensate for any warping which may occur. Smaller mating parts are checked for fit, and sanded if any tolerances are off.
Assembly
While a fully 3D printed gun is possible, the addition of a few common metal components greatly improves function and longevity. Commercially available steel barrel liners add proper rifling, and provide the necessary strength for the cylinder. A few compression springs and 3mm guide rods are used for the striker and charging handle. In order to comply with the undetectable firearms act, additional metal weights are epoxied inside the grips, bringing the total metal content over the minimum required mass.
Most of the assembly process is the same as my previous design. The barrels are cut to length, a chamber is cut using a #1 wire drill bit, and are epoxied and pressed into the cylinder. Additional guide rods and springs are cut to length for the new cylinder indexer and striker mechanism. Once all the parts are prepped, it’s a simple matter of screwing everything in place.
Conclusion
While I do love the simplicity of the original design, the addition of the charging handle does feel like a step in the right direction. I may play around with the design, possibly making it more ergonomic to grip, as I’m not extremely fond of the tiny knobs, especially after a lot of use.
Many have asked why I don’t implement certain features which other guns do, but unfortunately, small ratchets, catches, and linkages which are easily implemented in metal simply are not tough or precise enough to provide reliable functionality when printed in plastic at small scales. I believe this is why development of many 3D Printed designs are moving towards a simple printed receiver to house off-the-shelf parts adapted from common gun platforms.
As always, a warning about safety. A bad print, or degradation of plastic over time could lead to a failure. Assembly of a firearm should only be done by those with mechanical knowledge, and it needs to be understood that no matter what, building and firing a homemade gun is inherently dangerous. I do not recommend you build your own, and attempting to do so is entirely at your own risk.
You will need 7zip to extract.
Hello,
I really like the design of your revolver, I’m used to work as a gunsmith but I made all my designs with metal, I’m just getting into 3d printing do you have any advise or programs to use?
I use Autodesk 123d design for my stuff, but because it’s been discontinued, I would recommend Fusion 360. I also use Cura as my slicer.
Hello, where can i find your Stl files. This is what i am looking for a long time, great work!
Best reguards
Jan Dolecki
Great project! I modified the main body to accept the handle from a standard AR-15 or classic Liberator. It cuts down on print time per part, and is a little more comfortable if you ask me–let me know if you want me to send you over the file!