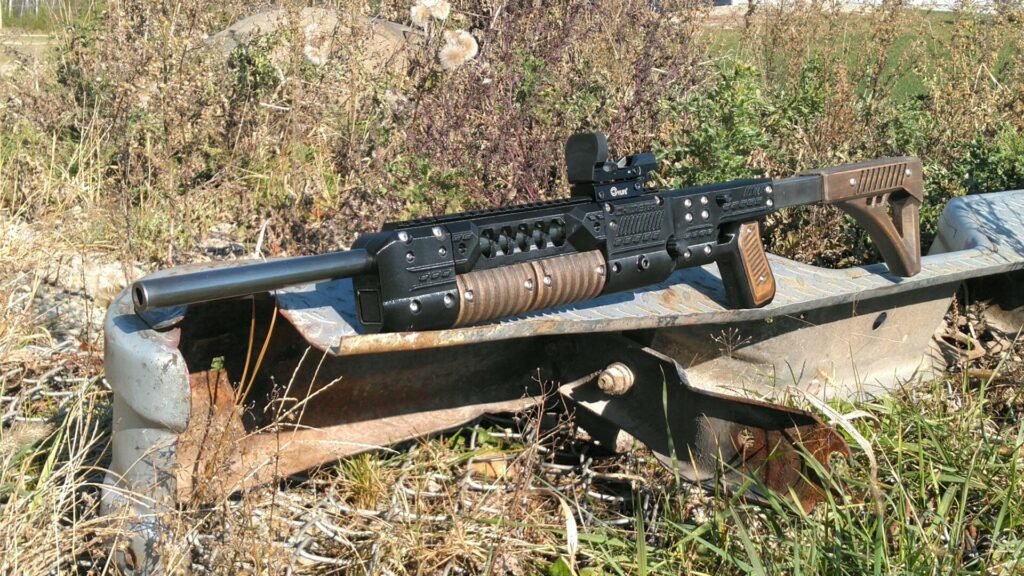
After the relative success of my 3D printed revolver, the Maverick, I decided to leverage the power of 3D printing to design an improved version of my shotgun. What I ended up with is the Chimera, a successor to my old design, and a hybrid of both 3D printed and Metal parts. It’s a very simplistic break action shotgun, sacrificing features in favor of being highly modular and very simple to build. Due to the large size, the design is split up into a few modular components, each of which clamped to a steel frame consisting of square tubing. I wanted to keep the design cheap and easy to source parts for, so no gun-specific parts are used, opting for commodity hardware.
Thanks to the extremely simplistic design, the only real parts I had to buy were the different sizes of tubing, screws, and steel rod. To get the exact size of tubing I needed for the barrel, I ordered that from StockCarSteel.com, your number one source for fabricating racecars or shotguns.
Most of this stuff was purchased last year so prices may have changed, but my grand total in parts at the time, including filament, was only around $80.
The majority of the striker mechanism was repurposed from my Maverick, and the break barrel latch is a reworked version from my old 12 gauge and is honestly quite similar to the locking hinge on a Razor Scooter.
Construction
All of the metal parts can be fabricated using common hand tools. Tubing is cut to length, and 3D printed templates are used to mark and drill holes and cut channels in the correct places. This worked a lot better than I expected, and all my metal parts came out perfect on the first try using just a hand drill, hacksaw, and Dremel. To make it feel a bit more professional, I even decided to go the extra mile and finish the prototype parts with a cold blue finish.
To complete the look, I printed the buttstock and foregrip in a wood PLA filament, which I then finished with wood stain. As usual, this turned out great, and really helps the finished product look like a production firearm.
Initial Testing
After everything was assembled, I went out back to take my first test shot. While it did work, initial testing showed that my original tubing was oversized for the cartridge, resulting in split cases. I ordered a new barrel with a smaller internal diameter, this time carefully reaming a proper sized chamber. After a lot of patient drilling, I was happy to find my persistence paid off, as I now had brass that not only looked pristine after firing, but was also easy to extract from the chamber.
Performance
At this point, it was time to have some fun with the design. Being a 410 with no choke, I was curious as to how bad the spread would be at a distance. At short ranges of around 5 yards, the pattern is already noticeably large, and at 15 yards, its almost laughably unusable.
This didn’t stop me from attempting to hit a few sporting clays in the back field though! I’d probably have just as much luck with a Taurus Judge, but of course, it’s still more than adequate for a bit of backyard fun.
Where the Chimera really shines, however, is use as a slug gun.
The 22” choke-less barrel does a fantastic job of throwing a lead slug down range with surprising accuracy. With a cheap red dot sight mounted on top, I could easily hit hard drive sized targets from between 20 and 40 yards, punching holes in whatever lies in its path.
Conclusion
Unfortunately, the Chimera is far from perfect. Like many of my designs, it lacks an ejector or extractor mechanism, though that hasn’t really been a problem personally. Additionally, while building it as a 410 allowed a greater margin of safety in component strength, 410 ammo has come to be extraordinarily difficult to come by.
What the Chimera lacks in features, however, it makes up in simplicity and flexibility. While many other 3D printed guns rely on parts kits from other firearms, every aspect of the Chimera was designed to use commodity hardware and components. I try to document my designs with detailed step by step manuals, making it a bit easier for others to replicate, test, and give feedback on. Hopefully other brilliant minds can chip in and add in features they would like to see on the platform, or to modify for different ammunition. Really, the Chimera doesn’t have to be a shotgun at all, and thanks to its modularity, it could easily use an array of different barrels and ammunition. I figure most handgun cartridges should be well within the capabilities of this frame, and in fact, I’ve been tempted to build a 9mm handgun variant. Here’s an artist’s rendition of what that could look like.
Ultimately, I didn’t design this to be my primary shotgun. I have a pump action 12ga for when I really need a shotgun. Really, I wanted to make a scratch build design, and the Chimera was an experimental hobbyist project building on some ideas I had. Thanks to the power of 3D printing, I was able make it a reality in a matter of months. It’s a cool looking conversation piece, and I’m proud to be able to show it off and say I designed it from scratch.
Conclusion
As always, a warning about safety. A bad print, or degradation of plastic over time could lead to a failure. Assembly of a firearm should only be done by those with mechanical knowledge, and it needs to be understood that no matter what, building and firing a homemade gun is inherently dangerous. I do not recommend you build your own, and attempting to do so is entirely at your own risk.
Download - You will need 7zip to extract the files (Keka on Mac)